

Introduction:
Deeply rooted in Indian culture and philosophy, Yoga is an ancient practice that connects the body, breath, and mind. What began as a spiritual practice today, Yoga proves to be very useful in promoting physical and mental well-being.
Classical Yoga includes different physical postures (asanas), breathing techniques (pranayama), and meditation (dhyana) to improve overall health. Yoga not only improves your overall fitness but improves body posture and flexibility.
Yoga in Chronic diseases:
Apart from keeping the body fit, Yoga helps treat various health challenges like anxiety, muscle pain, and chronic conditions like blood pressure. There are different breathing exercises and postures (asanas) that help maintain blood pressure.
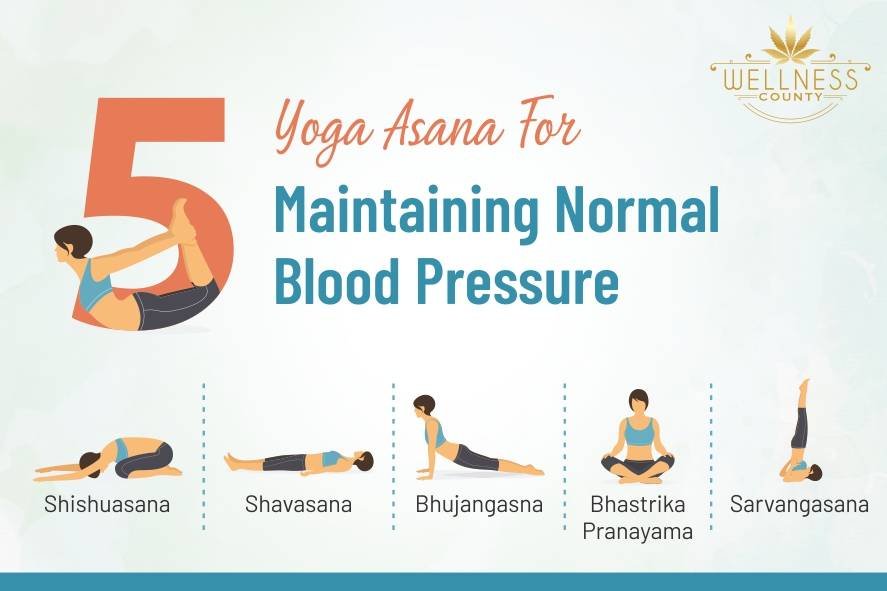
Which asana is helpful in maintaining normal blood pressure?
Now that you agree that Yoga helps you treat several chronic diseases, there would be a natural question in your mind. And that question would be which asana is helpful in maintaining normal blood pressure? And if you are also looking for the answer, then read on. Yoga has several asanas that can help maintain normal blood pressure. Some of the asanas that can help are listed below:
1. Shishuasana:
The name of this posture is derived from ‘Shishu (child) and asanas (posture). This asana resembles the way a fetus remains inside the womb. Also known as ‘Balasana’ (again meaning child pose), Shishuasana makes a person feel relaxed after inversions and backbends.
It relaxes the spinal column and encourages blood circulation throughout the body. This way, the asana helps in maintaining blood pressure.
How to perform Shishuasana?
- Sit down on your heels and rest your hips on them. Bend forward so that your forehead touches the floor.
- Keep your arms along your body with palms facing up.
- You may also place your fists one on top of another and rest your forehead on them.
- Press your chest gently on your thighs
- Stay in this position for a few seconds while focusing on the breath
- Slowly arise and sit back on your heels
Benefits of Shishuasana:
- Shishuasana decongests the chest and improves body immunity.
- Helps to stretch the hips, thighs and relieve pain in the chest, lower back, neck, and shoulders.
- It stimulates and flexes the internal organs in the body, keeping them active.
- Promote breathing and relax both the body and the mind.
- Promotes blood circulation throughout the body.
2. Shavasana:
Meaning ‘Shav’ (dead body) + asana (posture), this asana is referred to as a ‘yogic sleep’ that provides deep relaxation to the body. This asana is usually practiced at the end of a yoga session or between two asanas.
How to perform Shavasana?
- Lie down flat with your back touching the ground. To make your body comfortable, you may use a small pillow under your neck or knees.
- Spread your legs at hip-width and let your feet and knees rest completely.
- Place your arms close to your body with palms facing upwards.
- Start with deep breaths, and as your body relaxes, start breathing normally.
- Release all tension in your feet and leg, and surrender your whole body.
- Close your eyes and lie in that position for about 5 minutes.
- Now, roll onto your right side and lie in that position for a few moments.
- Using your right hand as support, gently sit up in a seated position.
Benefits of Shavasana:
- It relaxes the nervous system and provides deep meditative rest to the body.
- It allows time for the yoga workout to sink at the cellular level.
- It makes the heart rates and blood pressure normal.
- Reduces anxiety and alleviates insomnia.
- Provides energy and increase productivity.
Precautions:
- Always perform this asana on a flat, hard, and supportive surface.
- Practice the asana in a quiet, relaxing, and peaceful environment.
- Avoid all movements and distractions while performing the asana.
- Don’t practice this asana if your doctor has advised you not to lie on your back.
3. Bhujangasna:
Meaning ‘bhujang’ (snake, especially cobra) + asana (posture), this asana is commonly known as cobra pose. This posture opens up the chest and stretches the shoulders. This asana helps the body fight fatigue and relieves lower back pain, which boosts the body.
How to perform Bhujangasana?
- Lie on your stomach and stretch your back. The top of the feet should touch the ground.
- Spread the hands on the floor, under your shoulders. Hug the elbows back into the body.
- Now, push the lower part of the body firmly on the floor.
- Straighten your arms to lift your chest to a height where you can maintain a connection through the pubis to your legs.
- Press the tailbone toward the pubis and lift the pubis towards the navel.
- Make your hip joint narrow and buttock firm.
- Firm your shoulder blades against your back and lift your body through the top of the sternum.
- Hold the pose for about 20 seconds. Take normal breathes and then release the pose and exhale out.
Benefits of Bhujangasana:
As per our Vedas, Bhujangasana produces a lot of heat in our bodies. It also destroys many diseases and even awakens the ‘kundalini’, which is very important for those who use Yoga for meditation and spirituality.
The specific benefits of the asana are as follows:
- It stretches the overall body and strengthens the spine.
- It stimulates abdominal organs and helps relieve fatigue and stress.
- It opens our heart and lungs, improves blood circulation in the body, and acts as a therapy for asthma.
- It helps release stress and fatigue.
Precautions: of Bhujangasana:
- Don’t get over-excited and bend your back too much.
- If you are a beginner, raise your body to a height where you feel comfortable.
- While raising the body, don’t push the front ribs forward as this only hardens the lower back.
- Distribute the bank bend evenly throughout the entire spine.
4. Bhastrika Pranayama:
Meaning ‘blows breath’, Bhastrika Pranayama is a posture that requires rapid inhaling and exhaling. This provides the body with a lot of energy, so it is often called ‘the yogic breath of fire’. This rapid breathing makes our heart pump faster and thus raising the heartbeat and improving blood circulation.
Steps to do Bhastrika Pranayama:
- To begin, sit in Vajrasan or Sukhasan (cross-legged position). Vajrasana, however, is more effective as the spine is erect and diaphragmatic movement is better.
- Fold your arms and place them near your shoulders. Make a fist.
- Take a deep breath, raise your hands straight up and open your fists.
- Now, exhale with a bit of force, bring your arms down to the original position and close your fists.
- Repeat this 20 times.
- Rest with palms on your thighs and take a few normal breaths.
- Continue for two more rounds.
Benefits of Bhastrika Pranayama:
- This pranayama helps energize our body and mind.
- This pranayama helps increase our lung capacity and remove toxins and impurities.
- It helps overcome various respiratory disorders like sinus, bronchitis, among others.
- It helps remove any doshas in our body.
Contraindications:
- This pranayama should be conducted empty stomach.
- Pregnant ladies should not practice this pranayama.
- If suffering from hypertension or panic disorders, don’t try this alone. Better to have a trained teacher around.
- Listen to your body. Do it at your own speed. If you feel dizzy, increase the break duration.
5. Sarvangasana:
As the name indicates ‘sarvanga’ (meaning entire body), this asana has a favorable effect on our whole body. To get proper benefits of this asana, it is advised to attempt this posture in parts. Start with ‘ardh-sarvangasana’, and then after some practice, more to complete Sarvangasana.
Steps to perform Sarvangasana:
- Lie supine on the floor or a mat.
- Bring your feet together and hands beside the body.
- Keep your mind and body relaxed, take a full breath and raise your legs together, making a right angle with the body.
- Raise your body so that the hip joint should be above the ground. Keep the knees straight.
- Keep exhaling, hold your waist and push the body up as much as possible. Put the entire body weight on the arms and rest on the elbows.
- Once you settle in this position, shift your hands slowly towards the waist. Extend your fingers to the back of the hip bones. Press lightly with thumbs on both sides of the navel.
- Now, it’s time to move to the final position. Set your chin in the jugular notch and place the entire body weight on your shoulders, neck and back of the head. Do these steps in 4 seconds while exhaling.
- Hold yourself in this pose as long as you can. Keep breathing normally. Don’t do it for more than 2 minutes.
- Return to the previous position, slowly bend the knees, and gently lower the hips towards the mat.
- Release the hands from the back and get back to the starting position.
- Take a few deep breaths and then rest awhile, and breathe normally.
Benefits of Sarvangasana:
- This asana increases the interchange of blood in the upper body, especially the thorax, neck, and head. This has a favourable effect on vasomotor ability (causing or relating to the constriction or dilatation of blood vessels).
- This asana is very effective for increasing the blood flow towards the brain.
- The asana balances the circulatory, respiratory, digestive, reproductive, nervous and endocrine systems and boosts overall immunity.
- Helps a lot in stomach disorders like constipation and indigestion.
- The asana has a wholesome effect of gravity pressure on the various organs above the waist, including the vital endocrine glands.
- The asana provides flexibility to the cervical spine and has a favourable effect on the nerves.
Precautions:
- For all head-low postures, take extra care to avoid any possible strain or jerks.
- Start with only 20 seconds and then gradually increase. The maximum duration should be 5 minutes.
- Attempt this posture in parts. Start with ‘ardh-sarvangasana’ and, after a few weeks of training, move to complete asana.
- Any head-low pose should never be attempted after any rigorous exercise because the abnormal rush of blood to the brain at this stage may be very harmful
- If you are a beginner, it’s better to do this asana under the supervision of a teacher. Any unguided and hurried attempt may put undue pressure upon the heart, respiratory organs, and brain. This may cause discomfort, giddiness, and enlargement of the caliber of the blood vessels in the head.
Other ways to control blood pressure:
In addition to performing these asanas, it’s vital to maintain a healthy lifestyle. This includes altogether avoiding smoking. Smoking adversely affects the lungs and heart. Alcohol intake should also be limited. And finally doing some bit of walking and simple exercise is mandatory, as it keeps a watch on your weight.
Conclusion:
Most people think Yoga is only good for meditation and attaining spiritual health. Many people want to know if Yoga can help in curing other diseases. People often want to know which asana is helpful in maintaining normal blood pressure. This blog is intended to answer all those queries.
There are several asanas that maintain healthy blood pressure and help in proper blood flow and improve other medical conditions.